Manage Features and View Analytics with the New Data Desk!
Updated April 2019
Two of the most common requests we’ve gotten from Read&Write for Google Chrome users has been 1) an easy way to manage which features students can access, and 2) the ability to view usage data.
Why have these requests been in such high demand? Read on to find out.

Feature management is important during testing scenarios, for example, when teachers don’t want students to use a dictionary or other support feature while they’re taking a test. Historically, it has been difficult to turn a Read&Write feature on or off for just that one class or group of students without impacting students in other classrooms.
And usage data is important in helping teachers and administrators better understand how much Read&Write is being used. For students that are required to have access, it has been difficult to know if, when, and how they are actually using the tool.
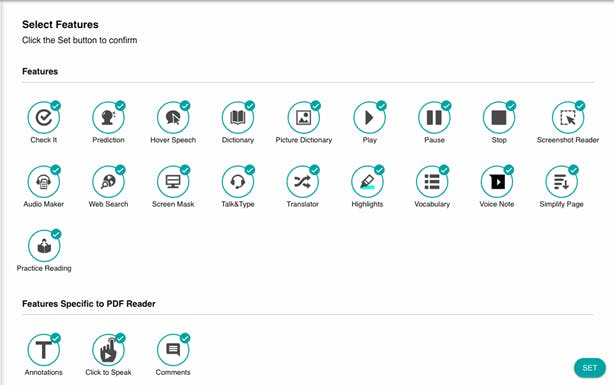
That’s where Data Desk, a feature and data management tool for Read&Write for Google Chrome, comes in. With Data Desk, teachers using Google Classroom can simply pick a class, select individual (or all) students in that class, and choose which features should or should not be available to those students. Teachers can even set a time limit for how long they’d like the new feature set to be active.
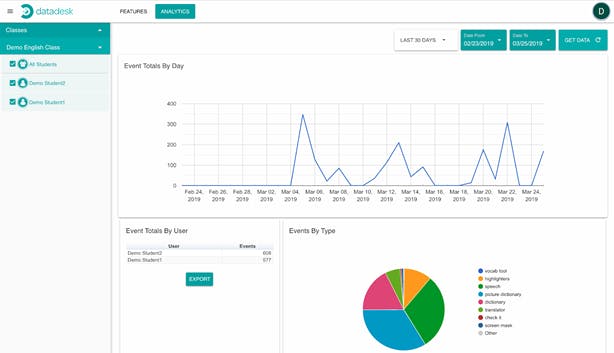
Similarly, teachers can choose the analytics tab, followed by a class or students, to view usage data over a specific time period. Once selected, click the “Get Data” button. Depending on the time period and number of students selected this could take a couple of minutes to generate.
Data is available from February 15th, 2019 onward.
Data Desk is currently available to customers with Group or Unlimited licenses that use Google Classroom. If you don’t have Google Classroom yet, it is available for free to all Google Workspace for Education customers. All you have to do is log in with your school account, and you’re good to go.
From there, you can set up Data Desk. To get started, teachers will need to visit datadesk.texthelp.com and sign in with their Google ID. A Google Classroom permission request will appear. Accepting the permissions will allow Data Desk to display the teachers’ classes, along with the list of students in those classes.*
Once the classes are imported, the teachers simply select which class or individual students they want to modify features for or collect usage data on and follow the instructions provided. Note that for feature management, unless a timer is set, all features that are unchecked will remain unavailable to selected students until they are changed back by an educator.
For more information, check out this short video demonstrating how Data Desk works.